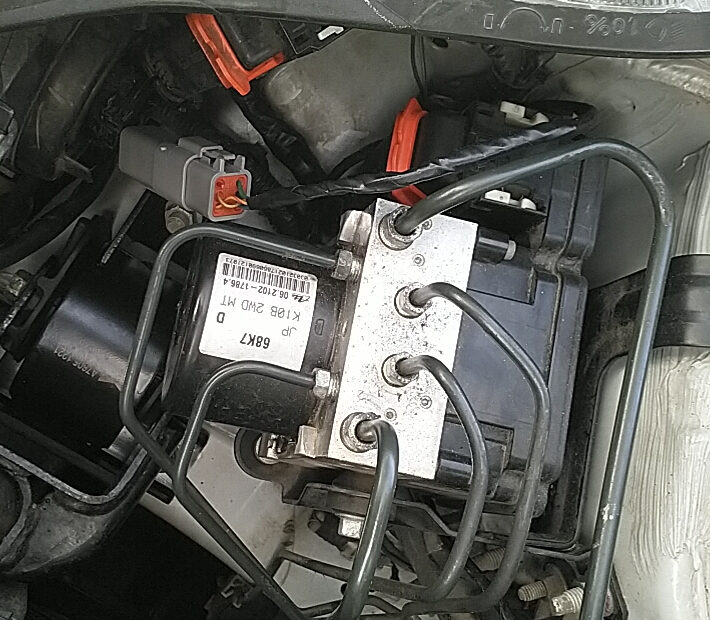
The ABS unit in my Suzuki Alto GL (2010) developed a rather disturbing fault, necessitating the need to replace the ABS unit fairly urgently, due to it causing brake failure when it activated.
I’ll set the scene. Imagine this…
You’re coming down a hill, slowing down to turn left at the roundabout ahead. There’s a decent gap between you and the vehicle in front, which has stopped at the roundabout unexpectedly. It’s not raining, but the road is wet.
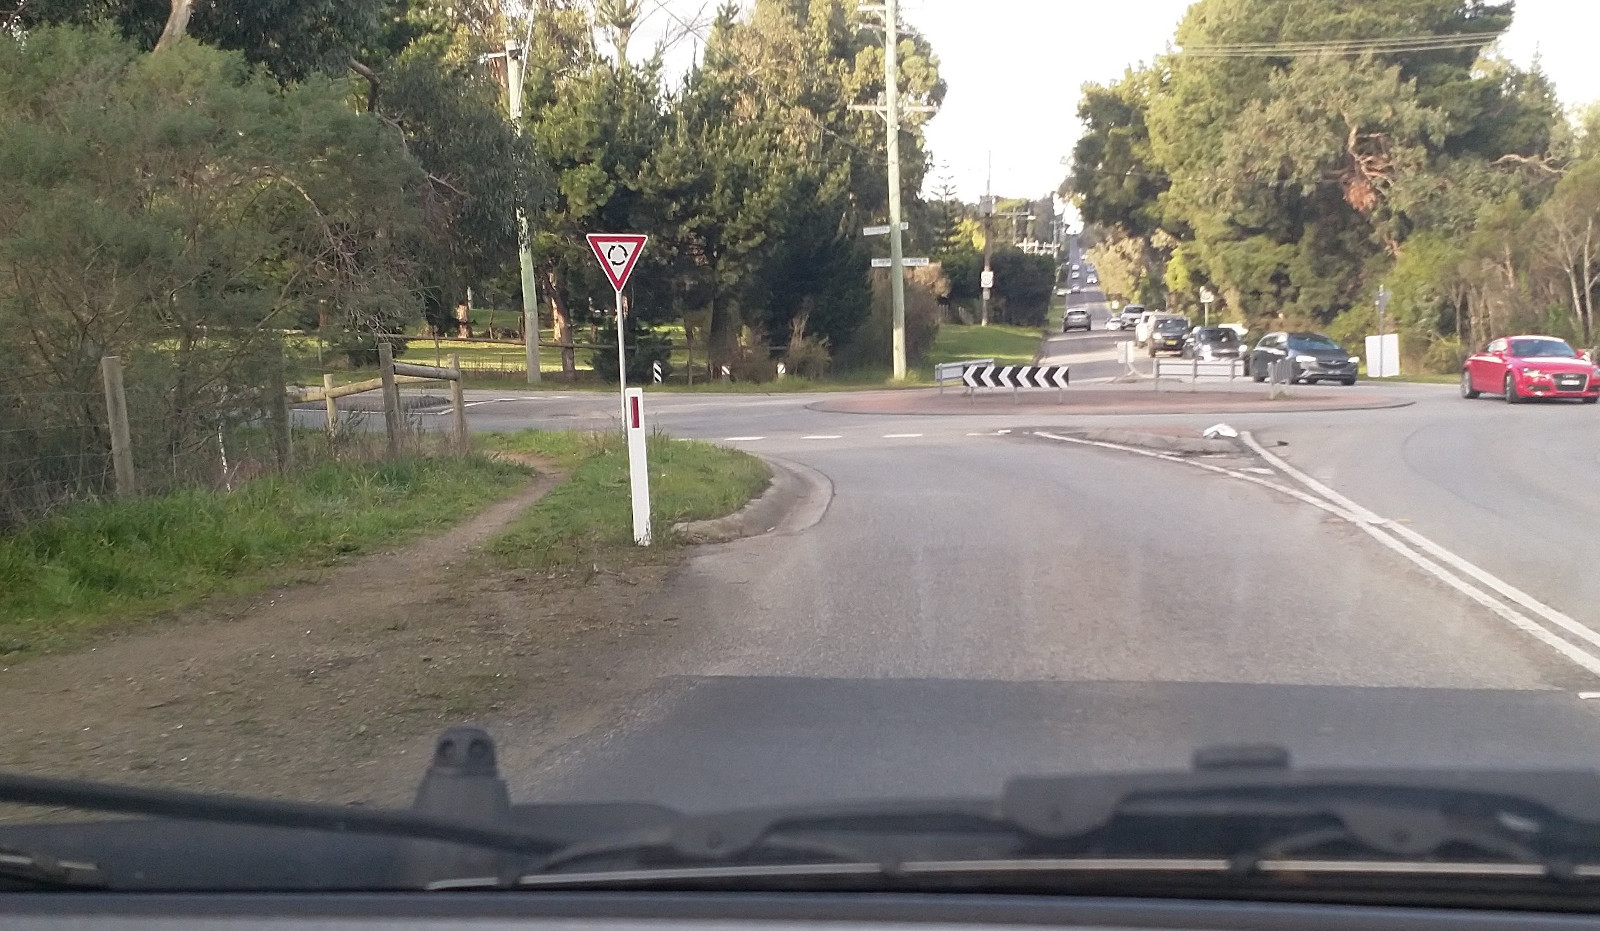
You’re closing in on the vehicle in front, and now you’re braking harder than you were planning to because you weren’t planning on coming to a complete stop. The vehicle in front isn’t moving, despite there being no reason to remain stationary. You’re about 3 meters away from the car in front when you hit a seam in the road. A wheel momentarily loses traction and the ABS unit kicks in to save the day, only it doesn’t. The pedal goes to the floor and the brakes fail. You’re 2-3 seconds from impact. You could go left, but you’re going to hit the concrete curb, take out a white pole with a reflector on it and probably the roundabout sign. In front is the rear end of the stopped vehicle, and to your right is unoccupied road for the other lane. The best option was to go through the roundabout on the wrong side of the road (photo of roundabout below, not on the same day):
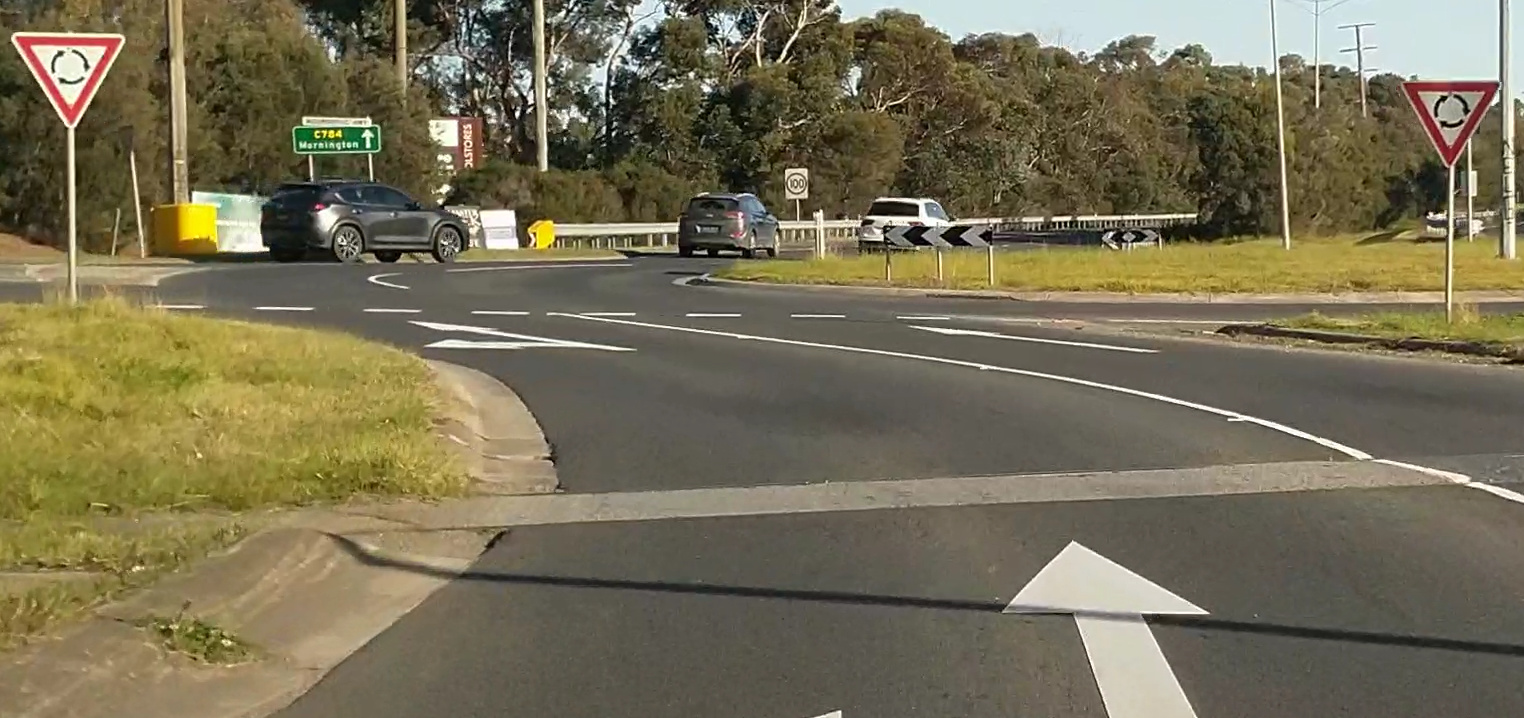
It’s another day, and a different roundabout. I’m slowing down as I prepare to turn left. This time, there’s no cars in front or even in the roundabout. It’s all going well, until I cross the railway tracks just before the roundabout while braking. The ABS kicks in for a moment, the brakes fail, and I end up turning left at the roundabout a little faster than I would have liked (photo of roundabout below, not on the same day):
There were many more events like this, and as I got used to this new characteristic of the vehicle, I started driving with more caution, slowing down earlier, picking escape routes while braking, releasing the brakes before going over railway lines, keeping an eye out for seams in the road before roundabouts and intersections and releasing the brakes just before driving over them. I basically learnt to live with it, but I knew there was going to come a time, probably sooner rather than later, when I’m going to need the ABS to work, and it’s going to do the exact opposite of what I need it to do.
When this would happen, the brakes wouldn’t work properly until you stopped the engine and pumped the brakes a few times. For whatever reason, pumping the brakes while driving, or parked with the engine running, wouldn’t normally fix the problem. After one of these events, the brake pedal would go to the floor, then on subsequent application of the brakes, the pedal would have some resistance where the brakes would normally start working, but the pedal would slowly sink toward the floor and the brakes would fade as it was doing so. Then, near to the floor, the brakes would start working again, and you could drive to your destination like that, stop the engine and pump the brakes. 95% of the time that would restore the brakes to normal operation (until the next ABS event), but other times they wouldn’t come good for a day or two, no matter how much you pumped them.
Symptoms and Diagnosis:
Initially, the brakes failed rarely, it was just something weird that happened a couple of times and I didn’t realise that it was ABS related. As time went on, the problem got worse and I realised that the brakes were failing whenever the ABS activated.
There were no fault codes stored in the ABS module. It was checked on multiple occasions.
The brakes were bled in an attempt to cure the problem, but this didn’t help.
At all other times, the brakes worked fine and the pedal felt good. It wasn’t soft or spongy.
After I’d decided that it was probably a faulty ABS module, I removed one of the fuses for the ABS module (the pump fuse) which made the ABS inoperable but still allowed the vehicle speed to be displayed on the speedometer and also allowed the CAN bus to continue working, so other modules could still communicate with each other. The vehicle drove fine like this – no brake system issues.
Oops:
Where this fairly straight-forward repair turned into an ABS to ESP upgrade, was when I went to a local self-serve wrecking yard and picked up the wrong ABS module. While I knew that there were some models that only had ABS and others that had ABS/ESP/TC, I didn’t realise that the connector on the engine bay wiring loom was different, or that the more advanced ESP module needed more sensors.
After I realised my mistake, I looked around for another ABS unit of the correct type, but there weren’t any available at the self-serve wreckers. Still not appreciating the work that would be involved, I decided to have a go at upgrading to the ESP version of the ABS module.
After studying the wiring diagrams for the ABS and ESP modules, I worked out that most of the necessary wires were already there, and that it looked like there were only two extra sensors and a TCSS (traction control) switch that were needed, so I purchased those and decided to give it a shot.
Unknown to me at the time though, was that there were other things that were going to be needed as well. Now that I’d spent the money on the ESP module and the extra sensors, I’d committed myself to this project. Unfortunately, the whole project got a bit expensive.
My initial plan was to just replace the ABS module, see if it worked or not, and whether or not it solved the problem. I was willing to play around with EEPROMs in order to make it work if need be, but it turned out that doing so wasn’t necessary.
Upgrading the ABS module to the ESP version:
Let me start by saying that doing this really isn’t worth the effort, and I’m not recommending that anyone does this. It was an interesting project but I probably wouldn’t do it again.
Parts Required:
- ABS/ESP/TC Module & Mounting Bracket
- ABS/ESP/TC Module Connector
- Brake Booster
- Brake Master Cylinder
- Yaw Sensor & Bolts
- Yaw Sensor Connector
- Yaw Sensor Cover & Bolts
- Steering Angle Sensor
- Steering Angle Sensor Connector
- TCSS Switch
- TCSS Switch Connector
- Instrument Cluster from an ESP Vehicle
- Automotive Wire (eg. from Rapid Cables)
- CANBUS Wire (eBay / AliExpress)
- Various connectors for the BCM (to get the sockets out of them).
- A Tacho from another Alto (if you don’t have one)
- Steering Wheel Puller
- Suzuki SDT (diagnostic software)
- Bosch VCM-II / VCM2 (or a good/high quality clone)
- Snap-on EPC for Suzuki vehicles
- An account on MHH AUTO (software, service manuals)
- ECM: Engine Computer / PCM / ECU.
- TCU: Traction Control Module (Automatic Transaxle Computer).
- SRS: Supplemental Restraint System (Airbag Computer).
- DLC: Diagnostic Link Connector (OBD-II Connector).
- ABS: Anti-lock Brake System.
- ESP: Electronic Stability Program.
- TC: Traction Control.
- ABS/ESP: This means I’m referring to both the ABS module and the ABS/ESP/TC modules or their respective connectors.
- Splice: Two or more wires joined together.
- CAN: Controller Area Network (a network of computers/modules that talk to each other).
- CAN bus: The physical wires connecting the various computers together.
- Tacho: Tachometer.
- SA sensor: Steering Angle sensor.
- Connector pin numbers: All pin numbers mentioned are from the point of view of looking into the unplugged connector from the front of the connector (the back of the connector being the side where the wires enter the connector).
- BRC-12/BRC-13: ABS Connector Wiring Diagram.
- BRC-65,66,67: ESP Connector Wiring Diagram.
- BCS-27, BCS-34: BCM Wiring Diagram & Connector Identification.
- PG-36: Shows location of connector G271 (Passenger cabin junction/fuse box).
- BCS-9 & BCS-10: Describes method to clear DTCs without a scan tool.
If you end up cutting and soldering wires, which I recommend you avoid, then use heat shrink tubing with a glue liner (double wall heat shrink tubing). The glue will seal the connection and keep out moisture, and will provide additional mechanical strength for the splice.
If you have a manual transmission, then get parts from a manual vehicle, if you have an automatic, then get parts from an automatic. Note that I did this on a manual vehicle, so the same upgrade won’t necessarily work on an automatic.
When buying parts, I don’t suggest you mix and match parts from different models of the vehicle, as the part numbers vary between the vehicles and you and I probably don’t know for sure that the part number is the only difference. The brake boosters, for example, look the same, but have different part numbers on them, depending on whether it’s for an ABS model or an ESP model and manual or auto. The brake master cylinders are also physically different. The brake lines that run between the master cylinder and the ABS/ESP modules are also different (ESP has thicker lines). The part numbers for the brake lines that run to the callipers and the callipers themselves were the same, so no need to replace those. The part numbers for the ABS/ESP wheel speed sensors are different, but I haven’t replaced mine as the ESP module works fine and the vehicle speed is correct (vehicle speed is broadcast on the CAN bus from the ABS/ESP module).
If you’re unsure whether or not you can mix and match parts from one vehicle with another, use the Snap-on EPC to check if the part numbers are the same or not. If they’re not, then you probably shouldn’t use those parts, as they may be different, even if they look the same.
Keep in mind that the brake system is a fairly important safety feature of the vehicle, so anything you do needs to be done properly and with due thought and care. This blog post isn’t actually here to tell people how to do this upgrade, it’s here to let any interested party know what they’re going to be up for if they do attempt it, and for my own purposes, to document what I’ve done, should I need to reference it in the future. It is primarily meant as an educational resource.
Testing:
I wanted to test that the ESP module I purchased and the various sensors were all working correctly and that the other computers in the vehicle weren’t complaining about missing the old ABS module or not being paired with the ESP module.
The service manual for the vehicle has illustrations of the ABS/ESP module connectors, and states which colour wires go to which position in the connector. You only need to match up the colours of the wires from the ESP connector to those in the ABS connector on the vehicle, using the service manual.
The wire colours in the ABS and ESP connectors are the same and go to the same things, so it’s fairly easy to do.
I made this test loom in order to test the ESP module:
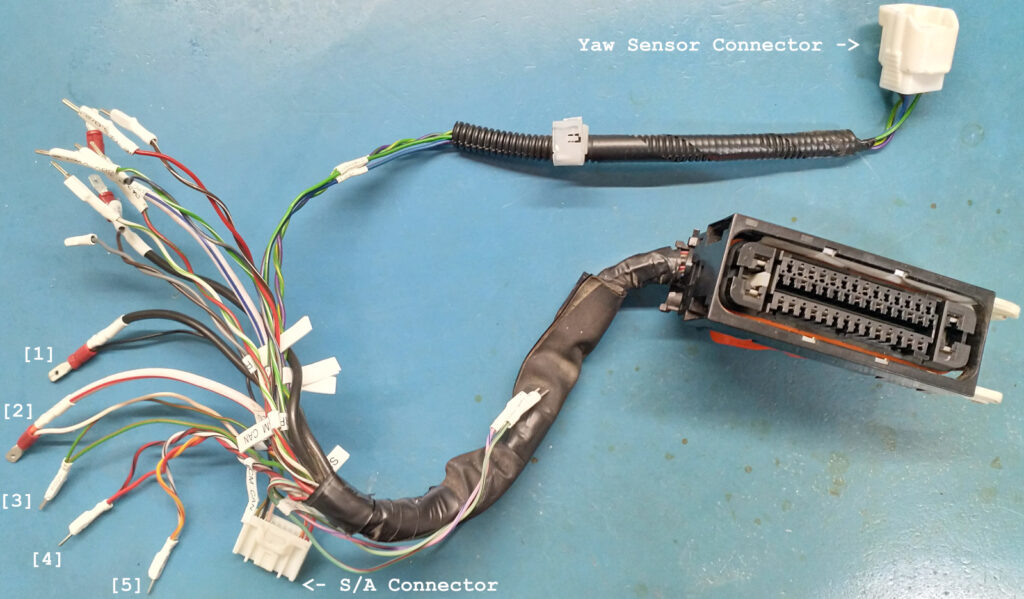
Notes regarding the loom above:
- Original high quality image: click here.
- The male pins used (with heat shrink tube over them) are for a male OBD-II connector. They’re made by Aptiv (formerly Delphi), MFG P/N 12047581. Available from Mouser (P/N: 829-12047581) or RS Components (P/N: 801-0884). The connectors were salvaged from scrapyard vehicles.
- Connecting the yaw sensor wires is easy – just match the colours up.
- The SA sensor needs 5 wires. These are permanent power, ground, switched power (ignition), CAN-H and CAN-L. In the service manual, the CAN-H and CAN-L wiring is reversed somewhere, which results in an inoperable CAN bus. The wiring in the above photo is correct.
- [1] Ground for the SA sensor is spliced into a ground wire for the ESP module.
- [2] Permanent power for the SA sensor, spliced into the permanent power wire for the ESP pump.
- [3] Ignition ON signal (this wire has battery voltage when the ignition switch is on).
- [4] CAN-H.
- [5] CAN-L
For those interested, the CAN bus in the vehicle is just a daisy-chain of controllers (computers) and sensors all connected together in parallel, and each end of the CAN bus is theoretically terminated with a resistor. The ECM connects directly to the ABS/ESP module via CAN, and the ABS/ESP module presents the same CAN bus wires on two more pins, which then connect directly to the BCM. The BCM then fans out the CAN bus to the SA sensor and the instrument cluster, and the instrument cluster in turn provides CAN bus connectivity for the OBD-II DLC connector. Any short or reversed wiring anywhere on the CAN bus will bring it down, preventing these controllers and sensors from talking to each other. This won’t prevent the vehicle from starting or driving, but there will be plenty of fault lights illuminated on the instrument cluster, and you won’t be able to talk to the various controllers (computers) via the CAN bus (eg. by using a diagnostic tool connected to the OBD-II port), but you can still communicate with some controllers (eg. the ECM, SRS computers) as they have an alternative bus as well.
You also need to connect the steering angle sensor, but it doesn’t need to be installed on the steering column for testing purposes. The steering angle sensor needs power and has to be connected to the vehicle’s CAN bus, as shown in the wiring loom photo above.
Once everything has been connected, you need to set up a container of brake fluid and some hoses (I just used PVC hose from the hardware store for testing). Get a syringe and prime the ESP module with fresh brake fluid, so that it’s not going to run dry. Put a reasonable amount of brake fluid into a container and connect hoses to all brake line ports on the ESP module, running them all back into the container of brake fluid. Ensure all lines are submerged in brake fluid, so that the pump can’t suck up air. Try to force air out of the test setup by using the syringe to pump more brake fluid through the ESP module. To achieve this, I cut the flared ends of the brake lines that go to the ESP module off a vehicle that was about to be sent to the crusher.
Using Suzuki SDT, you can check and clear any fault codes, perform diagnostic tests on the ESP module, and calibrate the steering angle sensor and yaw sensor. The diagnostic tests will actuate the pump in the ESP module and prove that the module is working. Unfortunately I don’t have a photo of this setup, but I just sat the ESP module on a piece of polystyrene board on top of the engine (engine not running).
Instrument Cluster:
Once you’re happy that the ESP module is working and that all of the computers are happy with it, you can install the ESP instrument cluster (called the “Combination Meter” in the service manual).
You only need to replace the instrument cluster in order to gain the ESP and TCSS light functionality. If you don’t care about this, then upgrading the instrument cluster shouldn’t be necessary.
Unfortunately, Suzuki found a way to save 20 cents (maybe less) and left the necessary components off the instrument cluster PCB used in the ABS-only vehicles. This is a fairly common theme I’ve run into when upgrading this vehicle. No speakers in the doors means there’s no wires going to the doors for speakers either. It seems that if they could save a few cents here and there, they did. To this extent, I was pleasantly surprised to find that the nuts for the yaw sensor were welded into the chassis of the vehicle, even though they weren’t used.
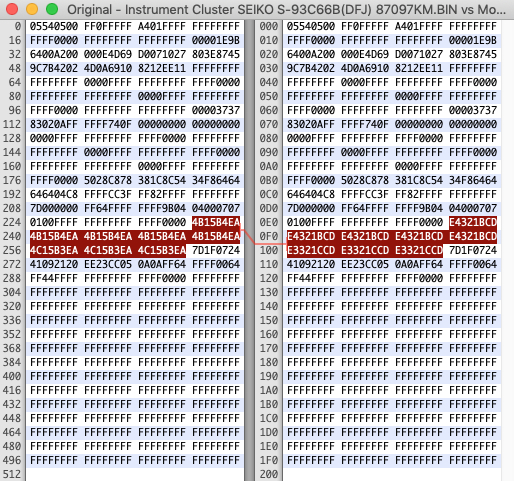
Upgrading the instrument cluster is easy, it’s just plug and play. I got an instrument cluster from a vehicle which had ESP, plugged it in expecting the ECM or BCM to have a problem with it, but no, it just worked. Whatever mileage was on the odometer in the vehicle it came from (in my case, much less than my original one) will be the mileage on your vehicle now. As such, you could play with EEPROMs and transfer your original odometer reading over to the replacement odometer cluster, as I did, or you could not bother. I would encourage you to be honest about the mileage if you ever sell the vehicle, and record the original mileage of both instrument clusters somewhere (eg. in the owners manual) for the next owner.
You can leave the ESP instrument cluster in the vehicle once it has been fitted, as the ABS unit will work fine with it. From memory, the ESP and TCSS lights will stay on, because the ABS module won’t command them to turn off, but other than that, it’s fine.
Tachometer Upgrade:
If you’re planning to fit a tachometer, the time to do it is when you’ve got the instrument cluster out of the vehicle. For some reason, the automatics have a tacho but the manual doesn’t, which was great thinking on Suzuki’s part. I did the tacho upgrade not long after I purchased the vehicle, but from memory it’s just 4 wires that run from the tacho and into the connector that plugs into the back of the instrument cluster. You should be able to get the sockets out of the instrument cluster connector on a salvage vehicle, using a safety pin or straightened out paper clip. There will be a plastic locking latch you’ll need to pry up as well. If you’re allowed to cut the connector out of the vehicle, then just do that, keeping the tacho wires in-tact, and deal with it later. Take a photo of where the original wires were in the instrument cluster connecter before you remove them, so that you can put them into your own vehicle in the correct locations, and practice removing wires in the connector that don’t matter to you first, in case you wreck something. Connect the wires and the tacho will work with either the ABS or ESP instrument clusters.
Steering Angle Sensor:
The wiring diagram in the service manual doesn’t show where all wires for the steering angle sensor are actually connected to. It shows them connected to other modules and things, but doesn’t tell you which connectors or which pins in those connectors the wires go to. They basically all go to various connectors either in the passenger cabin junction block (fuse box) or the BCM:
SA Sensor RED: G04-15 (BCM)
SA Sensor YEL/RED: G04-31 (BCM)
SA Sensor BLK: GND (vehicle chassis grounding point)
SA Sensor WHT: G271-29
SA Sensor GRN/ORN: G271-8
Notes:
- SA Sensor WHT is designated as WHT/RED in the service manual, but it’s solid white (no red stripe) in the vehicle I got the SA connector from, as well as in the vehicle I checked to work out where that wire goes in connector G271.
- Page BCS-34 of the service manual shows the location of connector G04 (which is a connector on the BCM, which is located behind the fuse/junction block in the passenger cabin).
- Page PG-36 of the service manual shows the location of connector G279 (front of fuse/junction block in the passenger cabin).
Preparing for Road Testing:
Before road testing, most of the upgrade needs to be completed. Swapping out the ABS unit for the ESP unit should probably be the last step, in order to keep the vehicle drivable. That said, you will still have brakes even if the ESP module isn’t connected, just none of the functionality and a few extra warning lights on the dash. The SA sensor, Yaw sensor and instrument cluster can all be installed while the original ABS unit is still in place and the vehicle will still be drivable.
- Install and wire up the SA sensor.
- Install and wire up the Yaw sensor.
- Preferably install the ESP instrument cluster.
- Install the ESP brake booster.
- Install the ESP brake master cylinder (leave brake lines disconnected).
- Remove the ABS module and install the ESP module in its place.
- Connect the four brake lines that go to the brake calipers.
- Connect the two brake lines to the master cylinder, but don’t connect them to the ESP module yet.
- Prime the brake master cylinder (more on this below).
- Wire the ESP loom into the ABS connector and temporarily connect the yaw sensor and TCSS switch wires.
- Bleed the brakes!
- Pump the brakes!
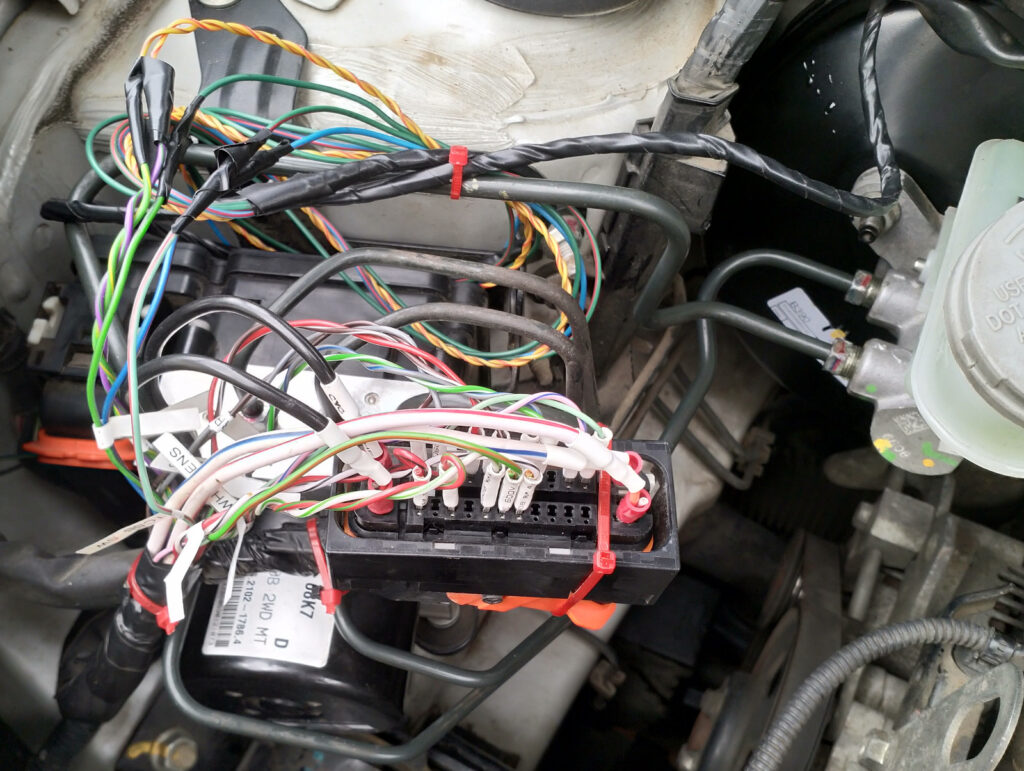
Permanent Installation of the ESP Module:
After confirming that everything really did work, I made an ABS to ESP adaptor, so that I didn’t have to modify the original wiring harness in the engine bay, and also so that I could put things back to how they were originally if need be.
The connector with all the wires soldered into it is from the original ABS module. I disassembled the original ABS module, removed the PCB and then cut off the male connector portion of the enclosure.
Here’s some photos of it:
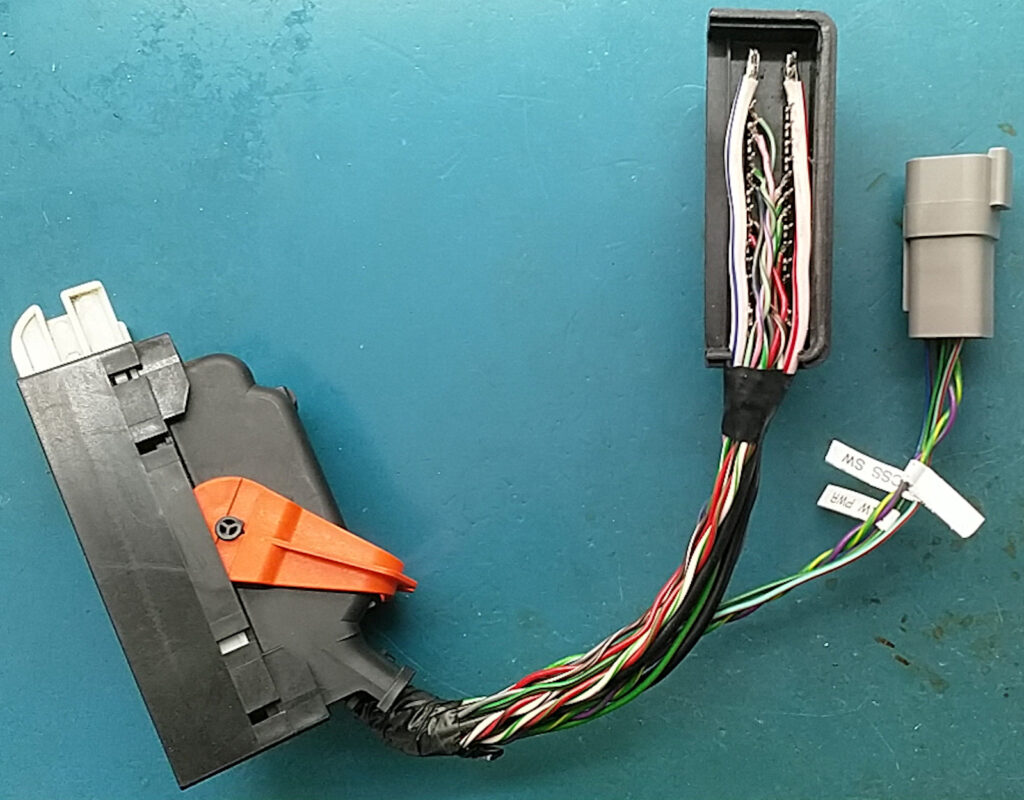
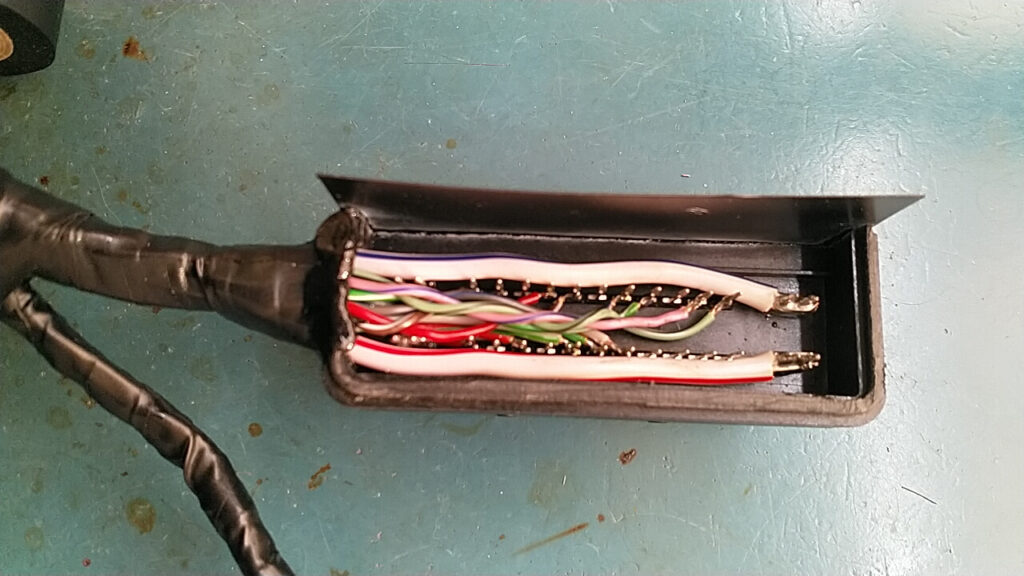
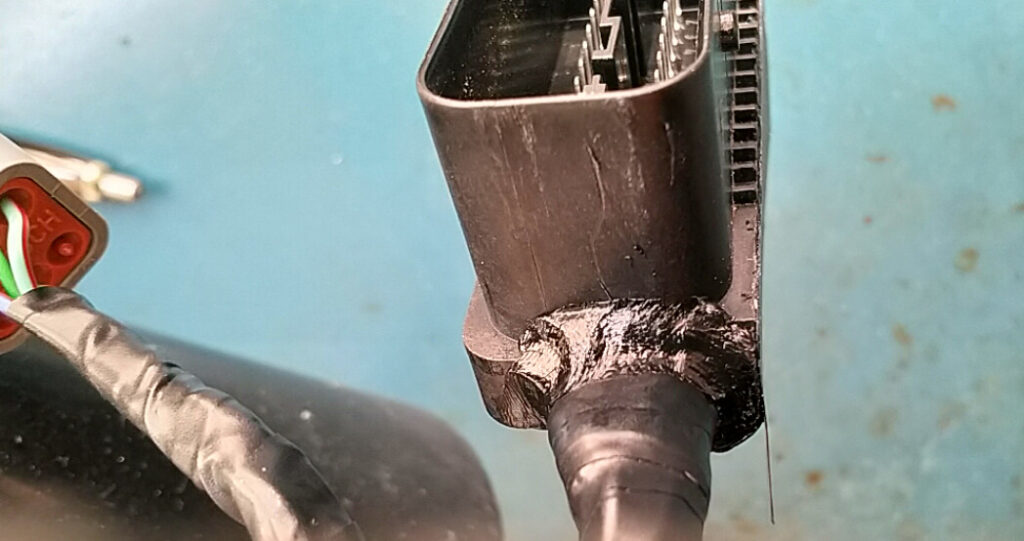
Above is just one way of achieving this, but really, it’s the hard way. The benefit of doing it this way is that it keeps the vehicle wiring harness in factory condition, and allows for a relatively easy downgrade back to ABS should it ever be necessary.
That’s basically the end of the upgrade procedure. If I were doing this to another vehicle, I’d be tempted to do it differently and avoid making the above harness.
There’s some decisions to be made with regard to how to make this a permanent installation and whether or not you’d want to make it permanent or not. The method I chose works fine, but it’s somewhat obvious that somethings going on there if you look around under the hood.
I chose not to cut and join (splice) wires, mostly because of the added thickness/bulk that all the heat shrink tube would add to the wiring harness in the vehicle. One way around that would be to stagger all of the splices, but that’s a lot of work. I also decided that it would be beneficial to leave the original engine bay wiring loom in factory condition, should I want or need to downgrade back to ABS in the future. I think that the way I did this was one of the best ways, but I also think the slightly better way would have been to replace the ABS connector with the ESP one, removing all of the sockets from the original ABS connector and inserting them into the ESP connector, in their correct locations. This way, there wouldn’t be an ABS<->ESP adaptor loom and the only splices would be the wires for the yaw sensor and TCSS switch (assuming new sockets for the ABS/ESP connectors aren’t available – I haven’t looked).
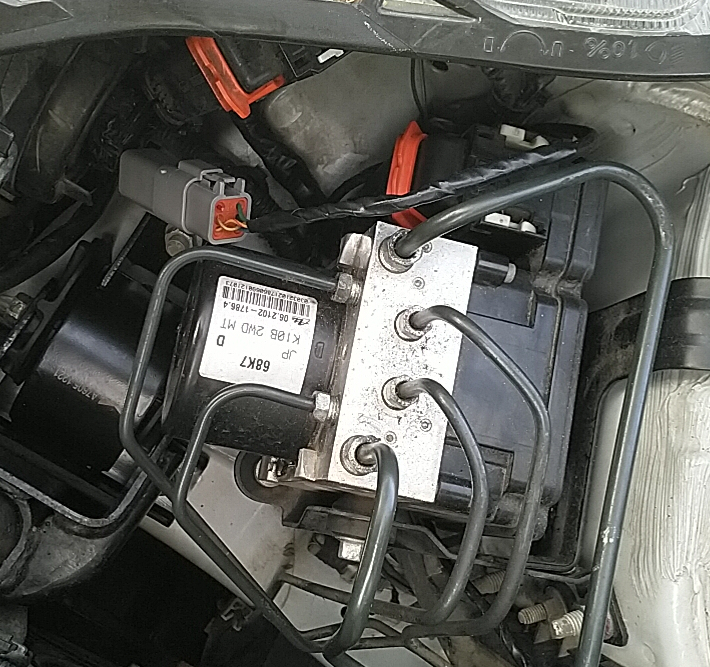
The completed upgrade, ESP module installed. Cable management is still to be improved:
Other things – Not necessary for the ABS to ESP upgrade:
As I was unsure about how hard it would be to make this upgrade work, I was prepared to muck around with the various computers in the vehicle or just replace them all if need be. As such, as part of this upgrade process, I also purchased the ECM from the vehicle that I got the ESP module from, as well as the BCM, instrument cluster and key reader (immobiliser antenna module).
If need be, I was willing to replace the whole lot, and then of course I’d have to deal with the immobiliser (part of the ECM). My plan was to just get someone to disable the immobiliser in the ECM if need be, but none of this was necessary. In preparation for this, I also purchased the necessary hardware to copy and reprogram the ECM, so that the software and/or EEPROM could be modified if necessary.
As part of this process, I also copied all of the EEPROMs from the original vehicle and most of the scrap yard parts, mostly just to have as a backup, but also because I was curious.
You can read (copy) or write (program) the ABS unit, instrument cluster and BCM by using an EEPROM programmer and a SOIC-8 in-circuit programming clip. The clocks need to be stopped, or the respective microcontrollers held in reset while this is done, so that they don’t interfere with the read/write of the EEPROM chips.
It’s fairly easy to stop the clock if there’s an external crystal on the PCB. I simply loaded them with a 1K resistor, which I figured probably wouldn’t damage the microcontroller crystal drive circuitry. When it came to the instrument cluster, I instead held it in reset by pulling the reset pin of the microcontroller low, which essentially disables the chip.
All EEPROM ICs were copied/re-programmed using a Minipro EEPROM programmer.
Here’s some photos:
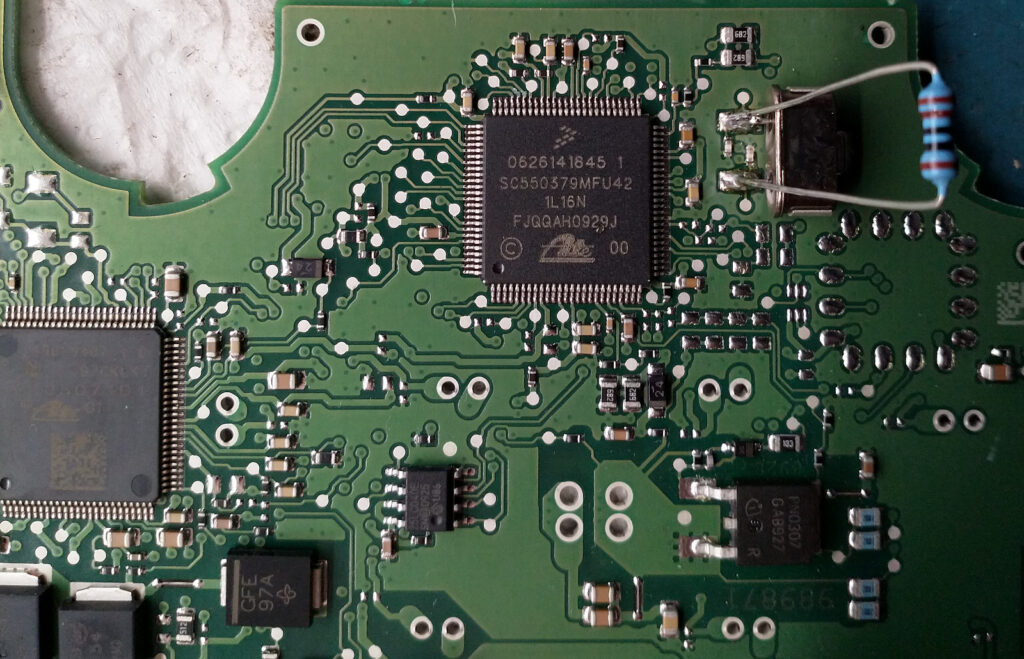
EEPROM: Microchip 25LC040E/SN
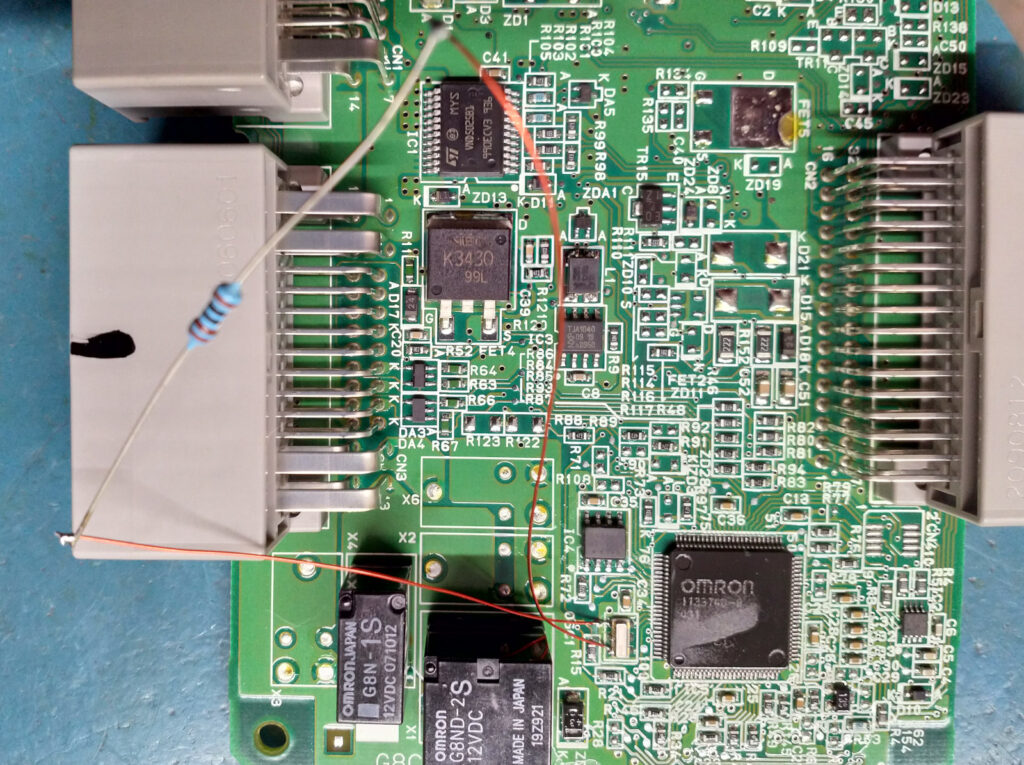
EEPROM: Seiko S-93C66B
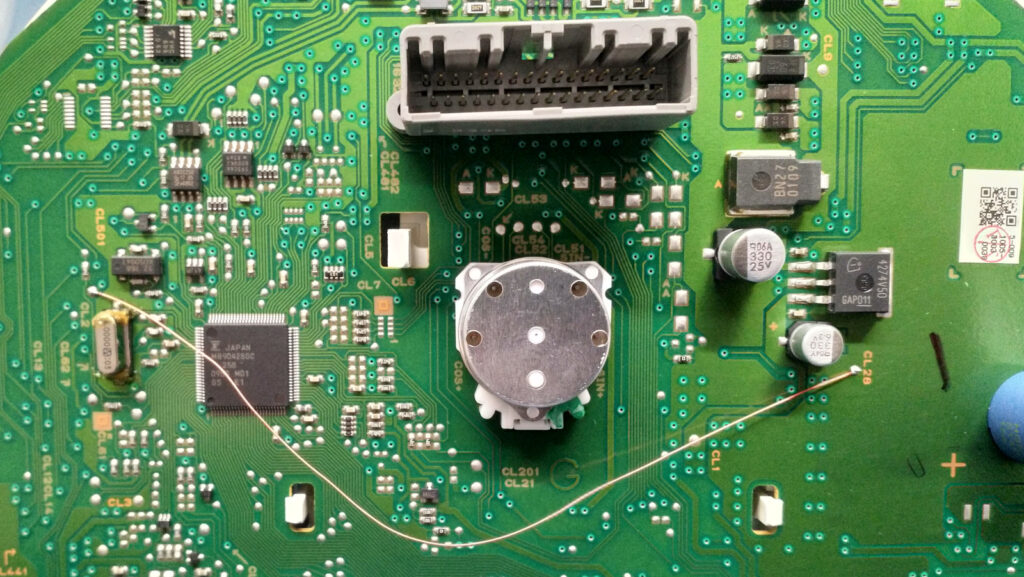
EEPROM: Seiko S-93C66B
